About This File

HookUI serves as a UI framework/loader designed for Cities: Skylines 2 (C:S2), functioning to replace the default UI with a framework that offers hooks for mod authors. These hooks enable the seamless integration of custom UI components into the existing game UI.
Caution: This version of the loader/framework is in its early stages; anticipate potential issues.
This framework/loader provides mod authors with the capability to develop small UI components independently or integrate them with their mods, minimizing the need to focus extensively on UI code.
It comprises several components:
-
Ingame UI
- HookUILoader: Loads actual components into the UI.
- HookUIAPI: Exposes a JS API for mod authors to "register" various UI components.
- HookUIMenu: Displays a menu to activate/deactivate panels created by mod authors.
-
Injected into the game at runtime
- HookUIMod: C# mod specifically designed for C:S2.
- HookUILib: C# library for mod authors to embed UIs directly into their C# mods.
Installation:
- This mod requires BepInEx
- Just place the mod (folder) in ...\Cities Skylines II\BepInEx\plugins\
For Modders:
UI only (React)
Quote
UI only means you'll only provide UI on top of already existing data/methods available in the UI. No C# code can be added in this mode. Useful if you want to add your own visualizations or similar. You can access any of the data you see in the default UI, on any panel, and also trigger the same events as the built-in UI can trigger.
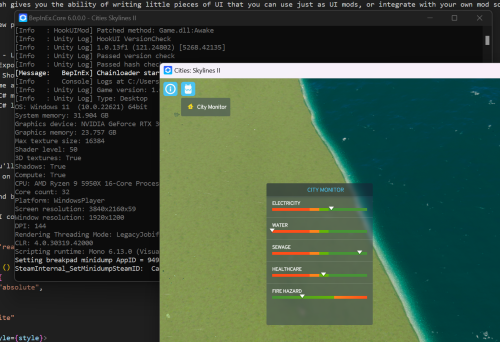
The example UI and built-in
City Monitoris a UI Only mod.
Write your React UI component:
import React from 'react';

const HelloWorld = () => {
    const style = {
        position: "absolute",
        top: 100,
        left: 100,
        color: "white"
    }
    return <div style={style}>
        Hello World
    </div>
}

window._$hookui.registerPanel({
    id: "example.hello-world",
    name: "Hello World",
    icon: "Media/Game/Icons/Trash.svg",
    component: HelloWorld
})
Then you need to compile the code from JSX to JS, and bundle the code. This shouldn't be news to you if you've ever dealt with React + JSX before :)
npx esbuild helloworld.jsx --bundle --outfile=helloworld.transpiled.js
Then finally you need to put the file in the Cities2_Data\StreamingAssets\~UI~\HookUI\Extensions directory in your game directory and it'll get picked up automatically, as long as it ends with .js
With C# Mod
WARNING: Not implemented yet.
Follow the same steps as with a UI-only mod, except the last step of putting the transpiled file into the game directory.
Instead, you should reference the transpiled file inside your mod with the HookLib C# API, and it'll automatically be used when the mod is loaded.
HookUIFramework
Warning: Not implemented yet. Pending seeing how people use the existing native API.
The loader exposes a small API to help you do some common things, so not every UI author needs to write so much code.
- Menu Button (Toggles a MovableModal between hidden/visible)
- MovableModal
- SubscribeData
- TriggerEvent
Misc / Notes
"Scrape" list of events in the frontend
var allEvents = {}
var clear = engine.on('*', (a,b,c) => {
    if (['climate.temperature.update',
         'cityInfo.residentialLowDemand.update',
         'cityInfo.residentialMediumDemand.update',
         'cityInfo.residentialHighDemand.update',
         'cityInfo.industrialDemand.update',
         'cityInfo.commercialDemand.update',
         // Other common but annoying events that happen, that we already know about
         "time.ticks.update",
         "input.setActionPriority",
         "cityInfo.happinessFactors.update"

    ].includes(a)) {
        return
    }
    allEvents[a] = a
    console.log(a,b,c)
})
Click around in the UI after running this to trigger calls to capture, then finally execute copy(JSON.stringify(Object.keys(allEvents), null, 2)) to get a JS array of all found events copied into your clipboard.
"Scrape" interactive triggers
function newEngineTrigger() {
    const args = arguments
    console.log('trigger', args)
    window.engine._oldTrigger.apply(this, args)
}
window.engine._oldTrigger = window.engine.trigger
window.engine.trigger = newEngineTrigger
Basic vanilla example
var myElement = document.createElement('div')
myElement.style.left = "300px"
myElement.style.top = "300px"
myElement.style.position = "relative"
myElement.style.color = "white"

var myLabel = document.createElement('span')
var myValue = document.createElement('span')

myLabel.innerHTML = 'Electricity'
myValue.innerHTML = 'N/A'

myElement.appendChild(myLabel)
myElement.appendChild(myValue)

document.body.appendChild(myElement)

// Subscription
var clear = engine.on('electricityInfo.electricityAvailability.update', (data) => {
    console.log(data)
    myValue.innerHTML = data.current.toString()
})
engine.trigger('electricityInfo.electricityAvailability.subscribe')
// later, unsubscribe
engine.trigger('electricityInfo.electricityAvailability.unsubscribe')
What's New in Version 1.1.0 See changelog
Released
No changelog available for this version.